System Requirements R.V.P.Server Module v4
The below table shows the minimum and recommended system requirements for running the v4 Module.
| Requirement | Minimum | Recommended |
|---|---|---|
| WHMCS Version | 6.3* | Latest stable 8.13.x |
| RCM Core Console Addon RMMCC | 4.6.3 | Latest 4.6.3 |
| PHP Version and PHP CLI Version | 5.6* | Latest 8.3.x |
| PHP Memory Limit | 64MB | 128MB 1) |
| PHP Database Extension | PDO | PDO |
| MySQL Version | 5.1.x | 5.7.x |
| MySQL Strict Mode | Disabled | Disabled |
| Ioncube Loaders for PHP and PHP CLI | 10* | 14 |
v4 Modules supports PHP 5.6*, 7.0*, 7.1, 7.2, 7.3, 7.4, 8.1, 8.2 and 8.3
* Support will be deprecated starting with the next major release 4.7
While these are the minimum requirements, we strongly recommend using the latest available, stable releases of all software.
- We validate our Modules to run in Linux based environments running the Apache web server. Other environments such as Windows based configurations may experience compatibility issues and are not officially supported
- v4 Modules does not support PHP versions with Ioncube loaders below 10.1.x! This applies for the PHP version used by the webserver as well as by the CLI (used by cronjobs)
- Keep in mind the Database Privilege Restriction if you have applied WHMCS recommendation for "further security steps" at https://docs.whmcs.com/Further_Security_Steps#Restrict_Database_Privileges
1) Memory requirements vary depending upon the size and volume of activity in an installation. Your exact requirements may differ.
Changelog R.V.P.Server Module v4
Version 4.6.1 (Top)
Release Date: 01.09.2025
- Bugfix: Control panel provisioning with initial order
- Updated: Improved configoption validation on intial order and upgrade order to ensure valid selection
- Updated: Missing configoption for cpanel 50 accounts blocks (core autoaddon setup updated)
- Updated: Code update to ensure full compatibility for all PHP 8 versions and backward compatibility
- Updated: Fully tested and ready for WHMCS 6.3 - 8.13.x and PHP 5.6 - 8.3
Version 4.6.0 (Top)
Release Date: 19.02.2024
- Bugfix: API changes implemented
- Bugfix: Hosting control panel password handling
- Bugfix: PHP 8.1 related
- Updated: Removed obsolete vps server plans
- Updated: cPanel Addons and managed services Addon implemented
- Updated: Ready for WHMCS 6.3 - 8.x and PHP 5.6 - 8.1
Version 4.5.0 (Top)
Release Date: 12.10.2020
- Updated: Server OS Addon
- Updated: Validation check routine for Control Panel and Server OS
- Bugfix: Module settings info for BW with wrong values (India Servers)
- Updated: Ready for WHMCS 8
Version 4.4.1 (Top)
Release Date: 17.08.2020
- Bugfix: PHP date/time fatal error if Order pending provisioning at LB Registrars
- Bugfix: Version compare issue in whmcs 7.10.x
- Bugfix: Duplicated renew button in whmcs 7.10.x
- Updated: Ready for WHMCS 6.3 - 7.10
Version 4.4.0 (Top)
Release Date: 13.01.2020
- Implemented: Validate Control Panel Upgrade for given Server OS
- Implemented: License Suppport for Cloud, Dualstack and HA Ennvironments
- Implemented: Module Debug Logs stored in separate database table and handled with the new Module Debug Log Tool from the Core Addon
- Updated: Next Due Date sync explicitly in UTC date/time to be in compliance with the exact next due date from the registrar
- Updated: Service Remote Next Due Date in Admin Area as per the WHMCS date format settings
- Updated: Improved License check routine with license error messages limited to Admin Area only
- Updated: Ready for WHMCS 6.3 - 7.9
Version 4.3.0 (Top)
Release Date: 30.10.2019
- Final Stable Release
Howto Install R.V.P.Server Module v4
R.M.M.Core Console v4
Have you installed and configured the Addon R.M.M.Core Console v4?
If you have not installed the Addon, then click the following Installation Documentation link to install the Addon first, required for all our modules: Howto Install R.M.M.Core Console v4
Once you have the Addon installed, proceed with TAB "Install" from this Installation Document.
Install R.V.P.Server Module v4
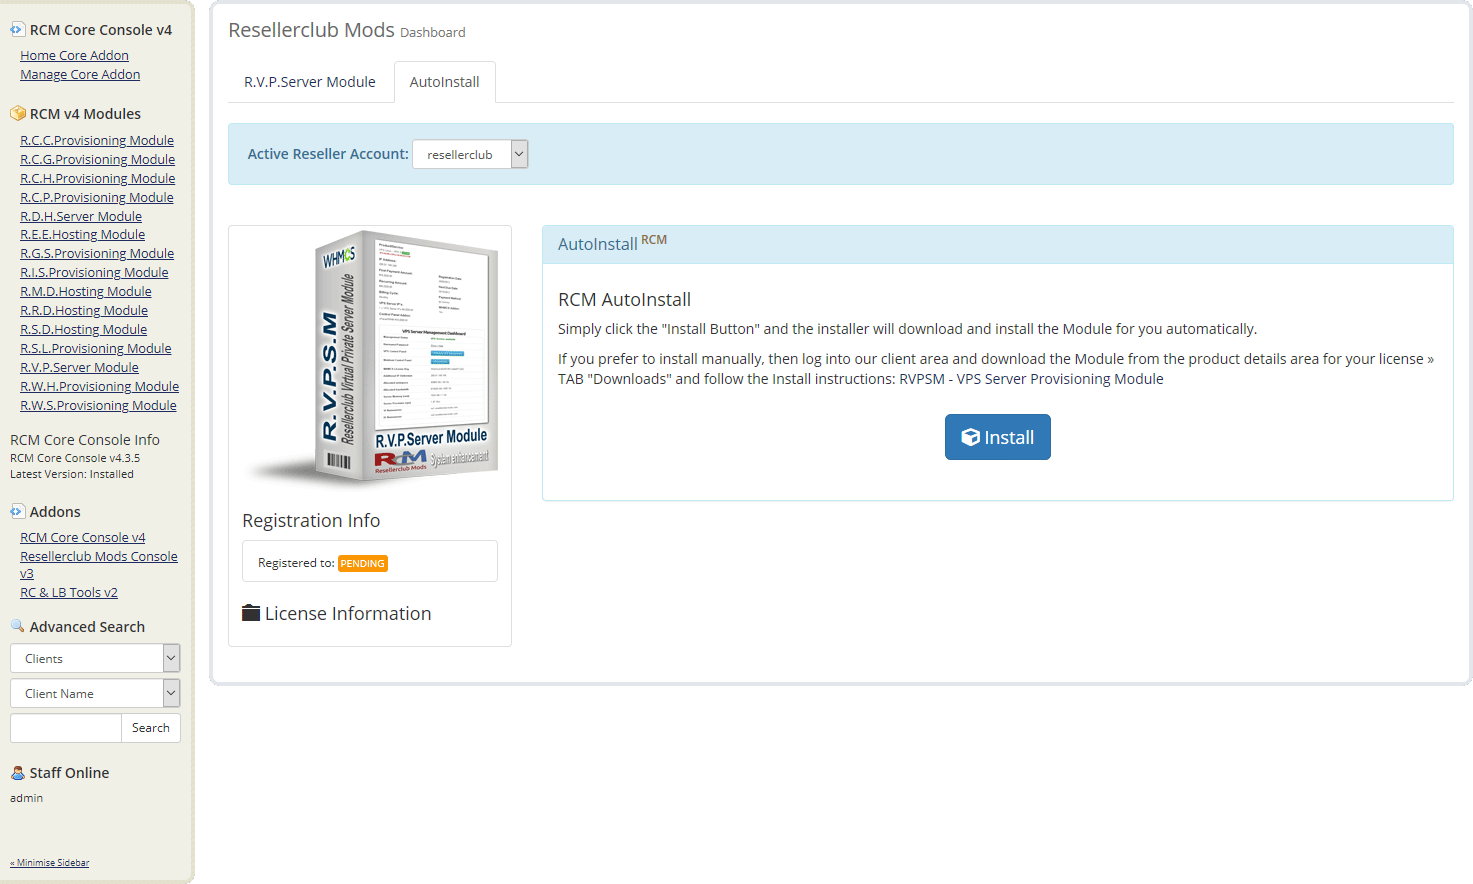
Goto to WHMCS » Addons » RCM Core Console v4 and access the R.V.P.Server Module Dashboard from the left sidebar Addon Menu or from the Core Addon Home widget. You should be able to see the following Management Area:
Auto Install
To install the module, simply click the Button "Install" and the Core Addon will install the Module for you automatically.
Manual Install
If you prefer to use the manual install method, then feel free to do that by following the below small guide:
- Download RVPSM - VPS KVM Server Module from the product license details page TAB "Downloads". Unzip the file with your prefered decompresion software.
-
Upload the complete folder "modules" from the unzipped local folder \rcmrvpsm_4.6.1_PHP_5.6_7.3\ into the whmcsroot/ folder. The "whmcsroot" folder is where you have installed your WHMCS.
In order to avoid errors and undesired surprises, you should not upload files and folders individually! Simply upload the complete folder modules into the folder where you have installed WHMCS.
-
Goto to WHMCS » Addons » RCM Core Console v4 and access the R.V.P.Server Module Dashboard from the left sidebar Addon Menu or from the Core Addon Home widget and click the "Validation" Button below the license details to finish the manual install.
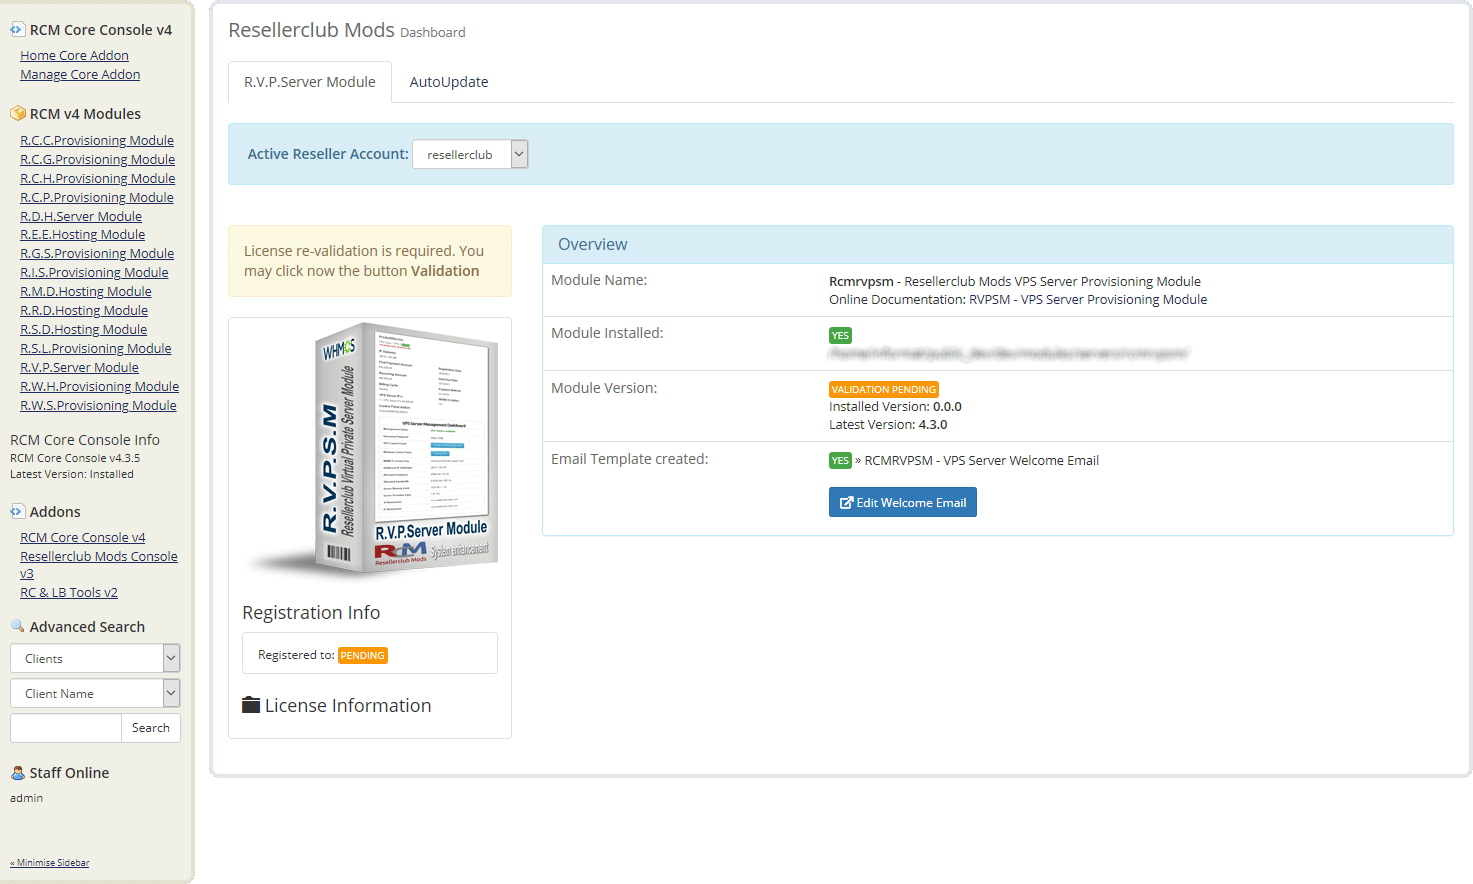
Once the Module has been successfully installed with the Auto or Manual Install Method you are ready to proceed with TAB Administrators Guide!
Managing the RVPSM - VPS KVM Server Module
To manage the Module, navigate in WHMCS to » Addons » RCM Core Console v4 and access the R.V.P.Server Module Dashboard from the left sidebar Addon Menu or from the Core Addon Home widget.
Getting started
First Time Setup
If this is the first time you install our Module to sell and manage VPS Server plans, then start right away with the AutoSetup Guide. Once you have setup the Products you would like to sell, proceed with the AutoAddons Guide.
Currently using the v3 RVPSM - VPS KVM Server Module
If you are using our v3 Module, then we suggest to start directly with the AutoMigrate Guide. Once you have migrated all your Products from the current v3 to the new v4 Module, proceed with the AutoAddons Guide.
Documentation Sections:
R.V.P.Server Module
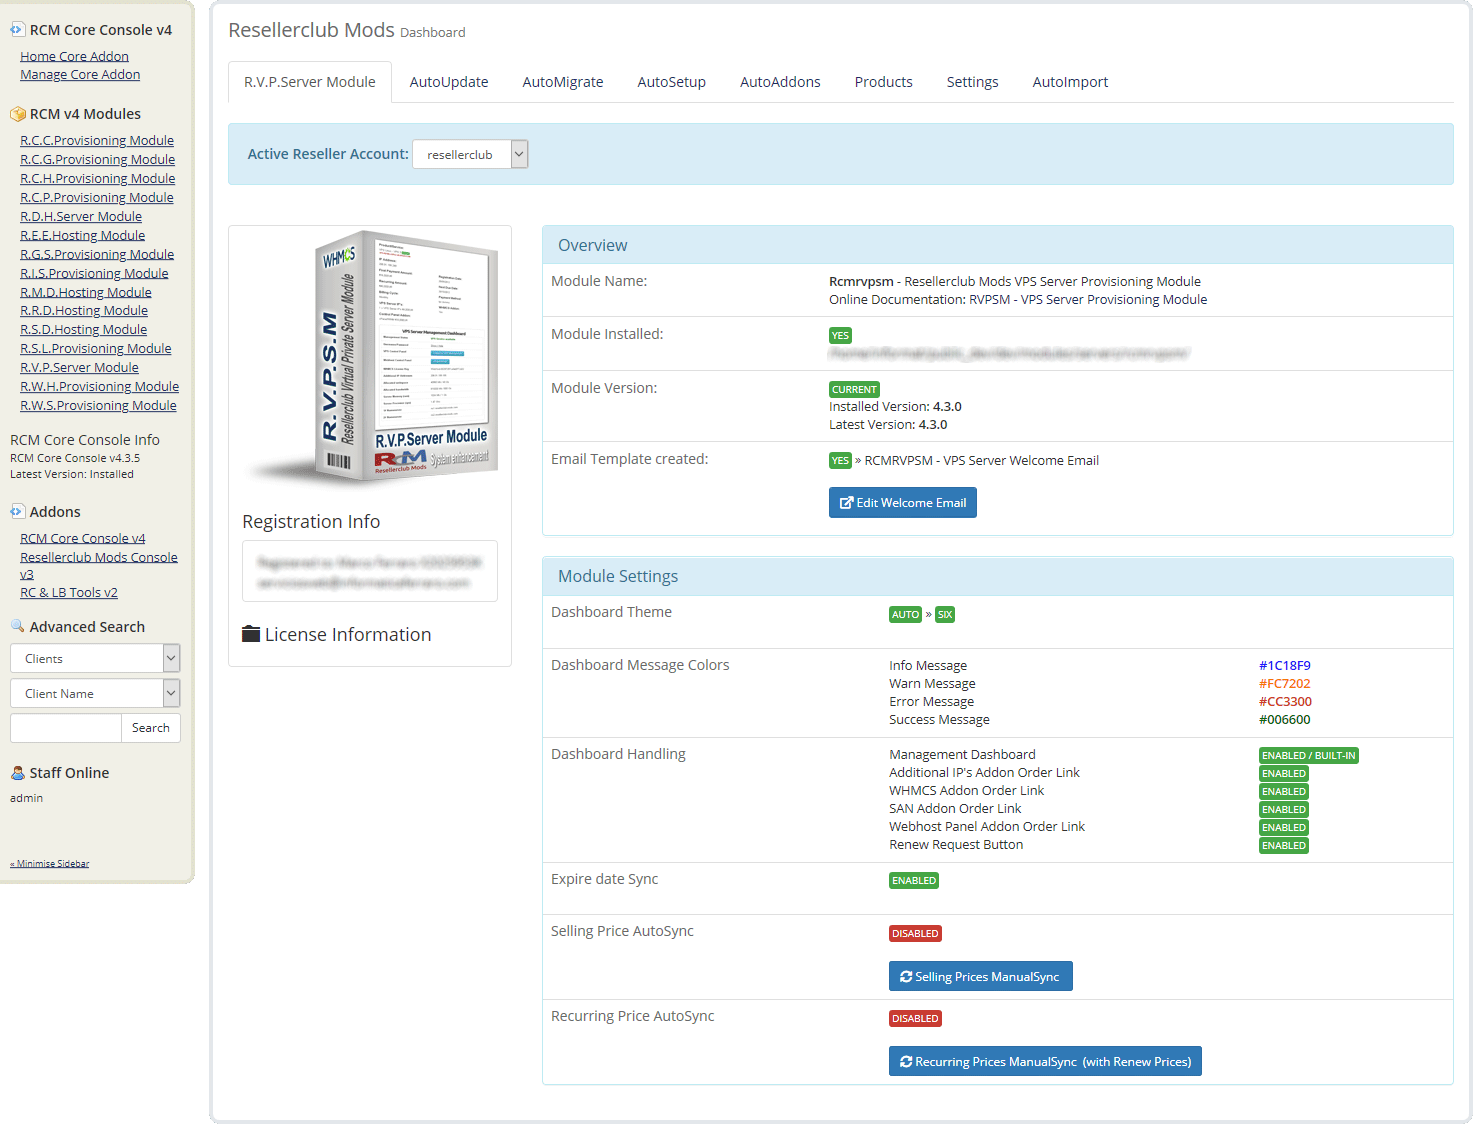
This is the Management Area with all details for your License, the Module Overview and the Module Settings at a glance:
Edit Welcome Email
With the installation, the Module has created automatically a Standard Welcome Email Template which you can use for the Product Setup. Click the Button "Edit Welcome Email" and feel free to modify to your liking.
Selling Prices ManualSync
By default, Selling Prices for Products/Services and Configurable Options will not be updated automatically with the Selling Prices from your Reseller Account when the daily cron runs. You can activate this option in TAB "Settings" or you can use the Button "Selling Prices ManualSync" to update all your Product Selling Prices in WHMCS. Both Options, AutoSync as well as ManualSync will fetch your Selling Prices from your Reseller Account.
Recurring Prices ManualSync
By default, Recurring Prices for Products will not be updated automatically with the Selling Prices from your Reseller Account when the daily cron runs. You can activate this option in TAB "Settings" or you can use the Button "Recurring Prices ManualSync" to update all Active Customer Products. Prices for all Configurable Options (Product specific and custom configurable options if present) are included into the recurring price update. Products with a recurring price set to 0.00 are considered as FREE and therefore excluded from the recurring price update process.
Further details about Selling Prices and Recurring Prices AutoSync are available in TAB "Settings".
AutoUpdate
Automated Update
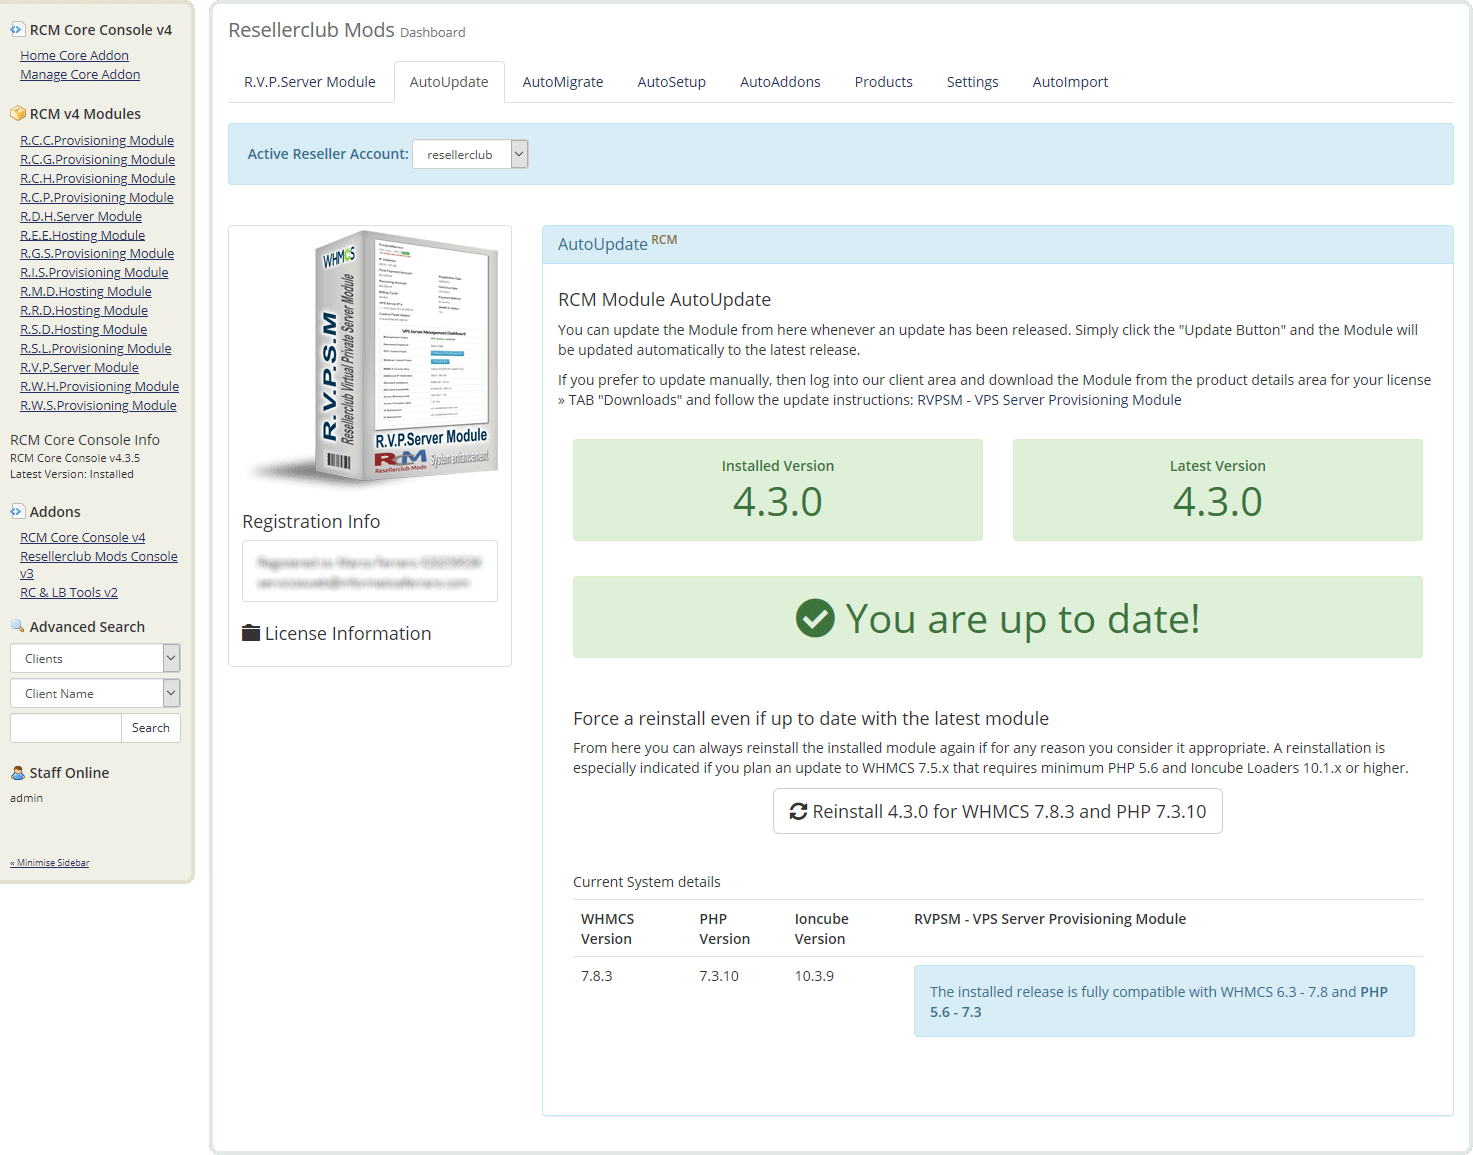
Whenever we release a new update you will be notified instantly by accesing the Management Area in TAB "R.V.P.Server Module". From TAB "AutoUpdate" all you need to do is click the Update Button and the Module will be updated automatically to the latest available stable release.
Manual Update
If you prefer to use the manual update method, then feel free to do that by following the below small guide:
- Download RVPSM - VPS KVM Server Module from the product license details page TAB "Downloads". Unzip the file with your prefered decompresion software.
-
Upload the complete folder "modules" from the unzipped local folder \rcmrvpsm_X.Y.Z_PHP_5.X\ into the whmcsroot/ folder. The "whmcsroot" folder is where you have installed your WHMCS.
In order to avoid errors and undesired surprises, you should not upload files and folders individually! Simply upload the complete folder modules into the folder where you have installed WHMCS.
- Goto to WHMCS » Addons » RCM Core Console v4 and access the R.V.P.Server Module Dashboard from the left sidebar Addon Menu or from the Core Addon Home widget. Click the "Validation" Button below the License Information to finish the manual update.
AutoMigrate
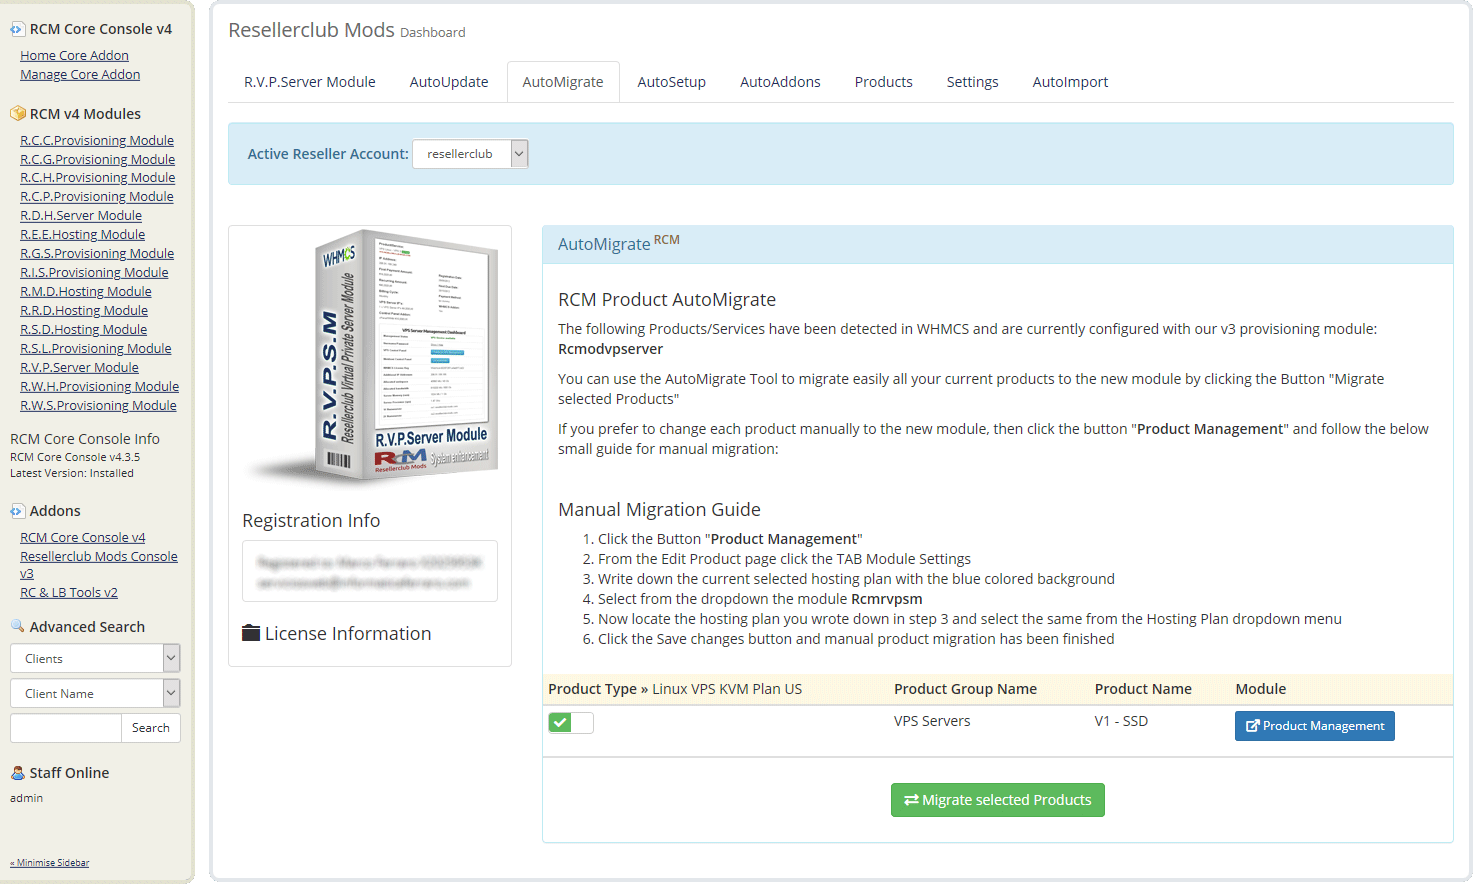
Automated Migration
If you currently have Products configured with our v3 Module then they will appear in TAB "AutoMigrate". You can use the AutoMigrate Tool to migrate easily all your current products to the new module by clicking the Button "Migrate selected Products". If you want to migrate only some of the current Products then you can disable those Products with the enable/disable switch.
Manual Migratation
If you prefer to change each product manually to the new v4 module, then click the button "Product Management" and follow the small onscreen guide for manual migration.
AutoSetup
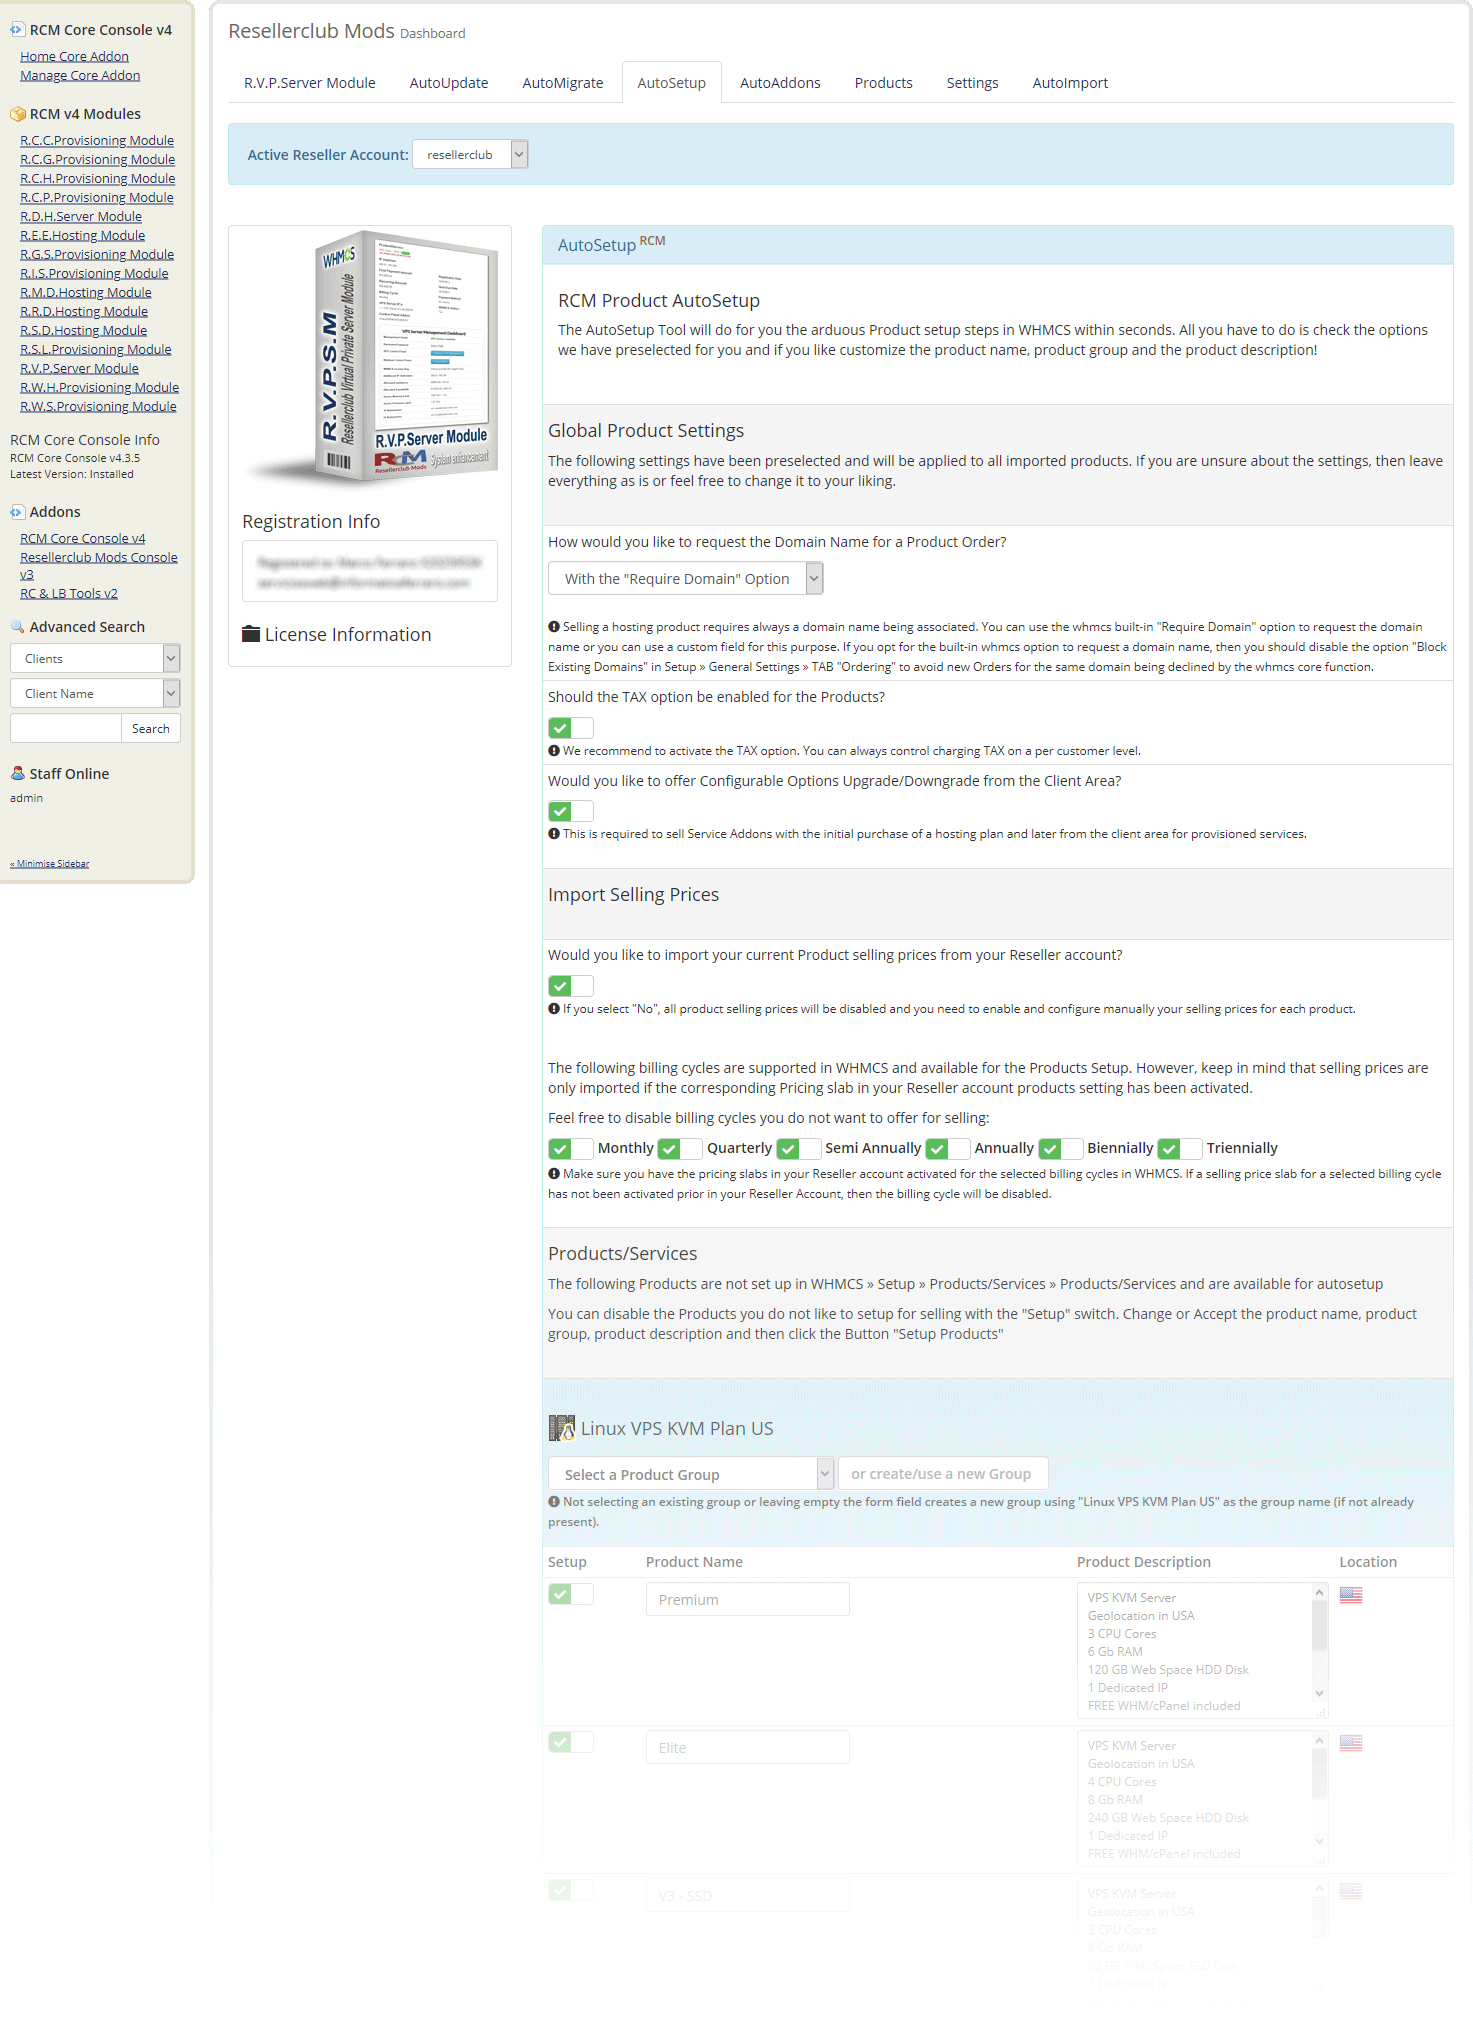
Automated Product Setup
Creating new Products in WHMCS is a time consuming manual task. With the new AutoSetup Tool you can setup new Products you would like to sell very fast. Everything is preselected and preconfigured by default and you can simply accept and create your Products immediately with a simple click! However, it is recommended to go through the Product Setup form and review all the available Settings:
Global Product Settings
Selling a hosting product requires always a domain name being associated. You can use the whmcs built-in "Require Domain" option to request the domain name or you can use a custom field for this purpose. Further details about the Global Settings are available onscreen.
Importing Selling Prices
Selling Prices are setup automatically and taken from your Reseller Account. It is highly recommended that you review first the Selling Prices in your Reseller Account! Managing Selling Prices in WHMCS is now an obsolete management task. Simply maintain your Selling Prices in your Reseller Account Up to Date and make use of the new AutoSync feature to update the Selling Prices in WHMCS automatically. Further details about Importing Selling Prices are available onscreen.
Products/Services
All Products available in your Reseller Account and not setup yet in WHMCS will be shown in the AutoSetup Form. All settings are preselected and prefilled. Feel free to modify everything to your liking. If you do not want to setup a specific Product, then simply disable it with the enable/disable switch to exclude the Product from the setup Process. Further details about Products/Services are available onscreen.
Once the AutoSetup process has been successfully executed you will be redirected to TAB Products which shows an Overview for all the Current and Active Products/Services as well as the Service Addons (Configurable Options) for each Product
AutoAddons
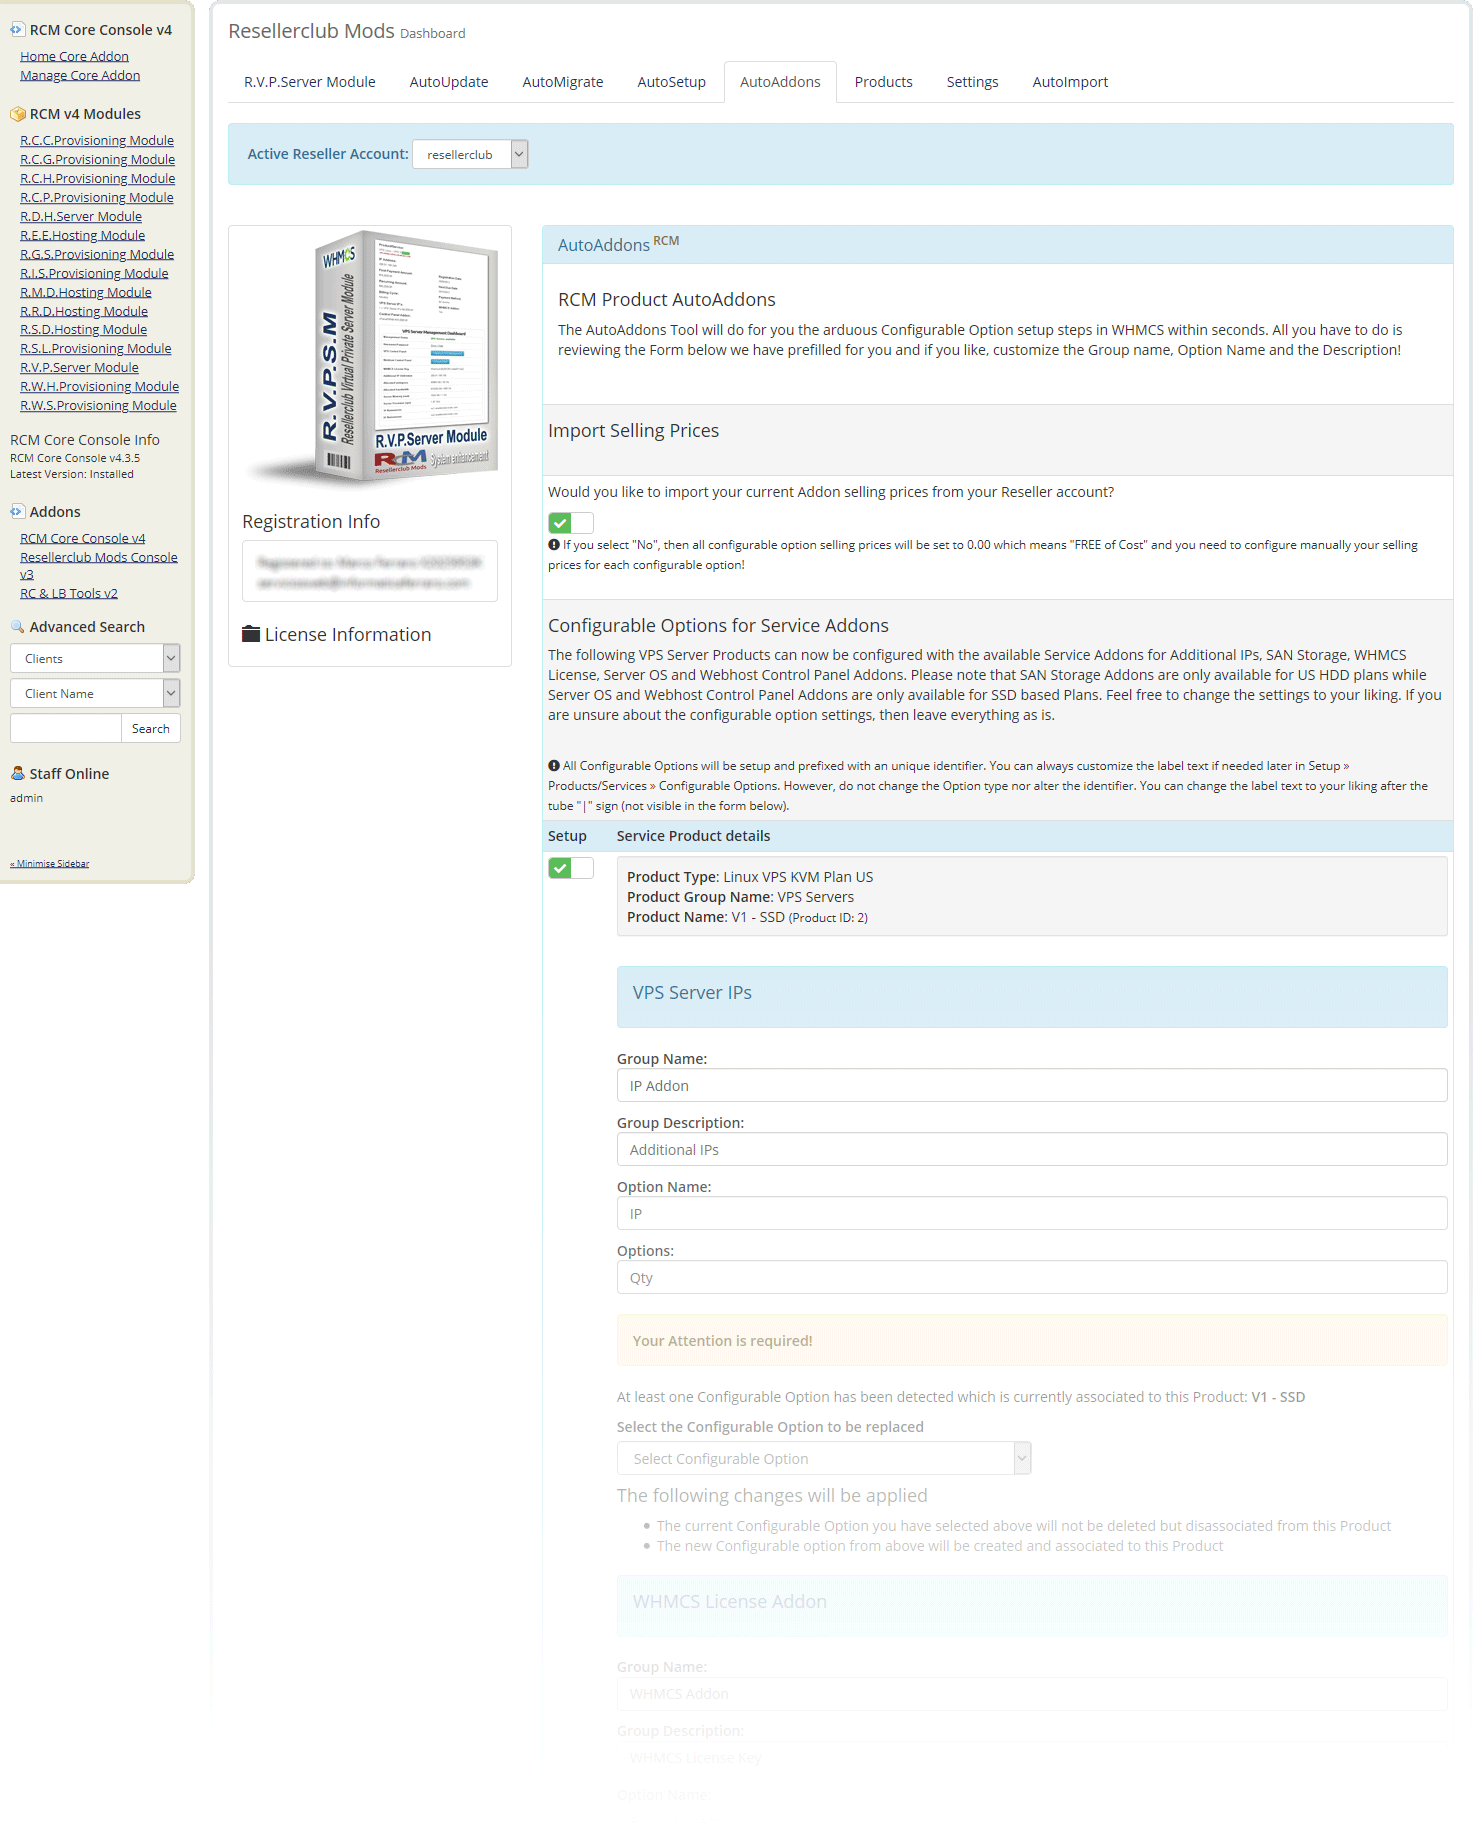
Product/Service Addons Setup
This tool will create the required Configurable Options to sell CPU Cores, RAM Gb and one additional IP for each VPS Server Product. Not only that, the tool also will take in mind the migrated v3 products, creating the necessary new v4 Configurable Option for the migrated Product as well as update all Customer Services who still have the previously Addon from the v3 module associated!
Background history
Unlike the new v4 module, all VPS Server Products across all Geolocations have shared the same Configurable Option using the old v3 module. The advantage of one unique Configurable Option was the pricing maintenance. However, the disadvandage with sharing the same Configurable Option is that not all VPS Server Services do have the same cost price for Addons and you were forced to apply the highest selling price to avoid loss of benefit. The correct way to solve this problem is creating for each Product dedicated Configurable Options but which makes maintenance a real nightmare if you have dozens of products.
With the new v4 module everything is automated and the Core Addon will do everything for you automatically. A new Configurable Option will be created for each new Product. For migrated v3 Products, the Addon will create a new Configurable Option and if there are Customer Services present using a migrated Product, they will be updated automatically with the new Configurable Option and the recurring price will be re-calculated correctly. Furthermore, the AutoSync Recurring Price feature will update all your recurring prices periodically with your selling prices from your Reseller Account, if activated in TAB "Settings" » Recurring Price AutoSync.
Summarizing: Zero maintenance in WHMCS for Products and Configurable Options = Saving Money and valueable human working.
All you need to do is mainain all your selling prices in your Reseller account, indeed much more easier to update than in WHMCS, and activate the AutoSync Recurring Price option.
Import Selling Prices
It is recommended to leave the switch to enabled. Further details are available onscreen.
Configurable Options for Service Addons
The form is prefilled with the labels for Group Name, Group Description, Option Name and Options. Feel free to customize the labels. Some Configurable Option may require your attention! This applies only to migrated v3 Products currently not used by Customer Services as well as for Customer Services with the old v3 Configurable Option associated. In this case you need to select the current Configurable Option which is used for the Service Addons. Further details are available onscreen.
Once the AutoAddons process has been successfully executed you will be redirected to TAB Products which shows an Overview for all the Current and Active Products/Services as well as the Service Addons (Configurable Options) for each Product.
Products
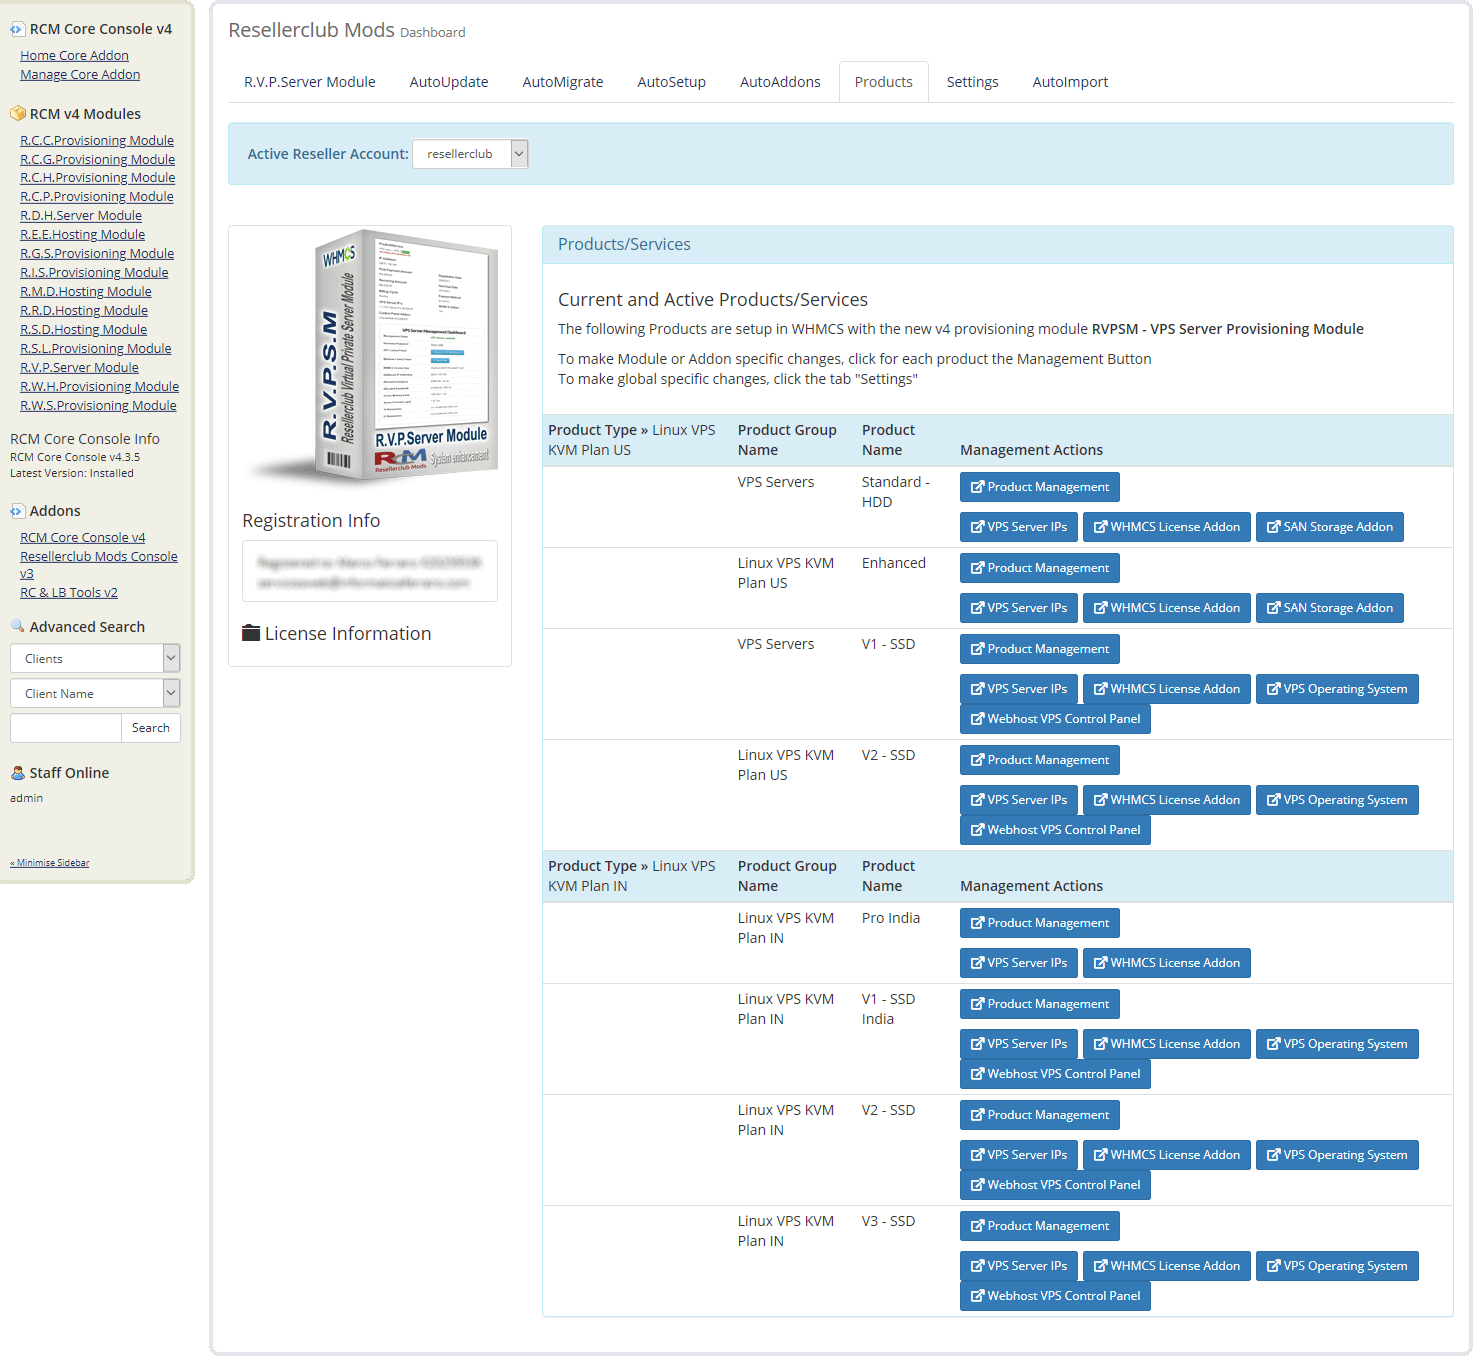
Overview
The Products TAB shows all Products and the corresponding Addon for each Product currently setup with the v4 Module at a glance.
Products and Addons
The Product Management Button allows you to access the Products Setup directly without the need to navigate in WHMCS to the Product for which you like to review the configuration or change the settings. The same for the Addon Management. However, the Addon Button may have several colors depending on the status for an Addon:
Orange Button

The Orange color Button indicates that the Addon is missing. Click the Button to access directly the AutoAddon TAB for automated setup. See Documentation Section AutoAddons in this Document.
Red Button

The Red color Button indicates that the Addon is present but not associated to the corresponding Product. Click the Button to fix this issue immediately.
Blue Button

The Blue color Button indicates that the Addon is correctly configured. You can access the Configurable Option and adjust the labels for Group Name, Group Description, Option Name and Options as well as the Sort Order number.
All Configurable Options are prefixed with an unique identifier! Never change the identifier before the Tube sign "|". The Option type is mandatory and should not be changed! Everything else such as label text after the Tube sign "|" and sort order number can be adjusted to your needs.
Settings
This section is currently under developement. However, each option is explained onscreen in details. If you have questions about any of the available options, do not hesitate to drop in a ticket and let us know your doubts and we will gladly answer.
AutoImport
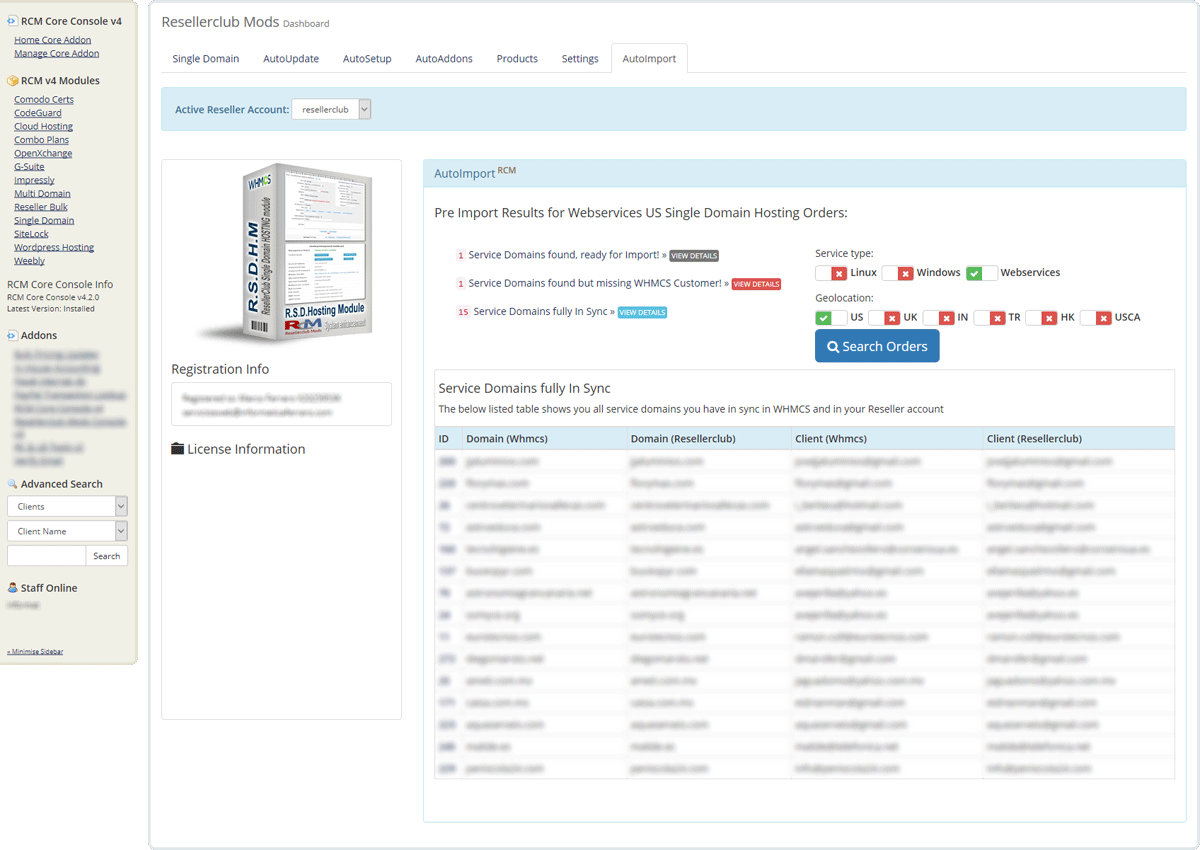
Overview
This tool will help you to import into WHMCS all your current Active and Suspended Orders for each Product type. In addition to importing Orders, this tool also shows the Orders that already exist with their corresponding status as well as Orders which can be imported and those with issues who need to be fixed first before import.
Search Orders
Begin by selecting the Product type for which you would like to obtain details and click the Button Search Orders. The AutoImport Wizard will search all Orders you have in your Reseller account and generate a list of Orders based on their status. There are 4 possible Import status:
Service Domains found, ready for Import!
Shows you the service domains which are missing in your WHMCS. You can import those Orders which have a checkbox. You can select all or some of the Orders you would like to import. Orders with an exclamation sign instead of a checkbox cannot be imported because the required Product is missing and you need to setup the same before you can Import services.
Service Domains fully In Sync
Shows you the service domains which are fully in sync between WHMCS and your Reseller Account. You can access a Service directly with the Service ID Link.
Service Domains out of Sync!
Shows you those services which are present in your WHMCS but considered out of sync due to customer email mismatch between WHMCS and your Reseller account. The customer email address must be the same in both systems. You should fix this asap. Click the Service ID link to access the service to obtain more details about the out of sync status.
Service Domains found but missing WHMCS Customer!
Shows you the services which cannot be imported until you have added the missing Customer in WHMCS. Use our FREE Tools Addon to easly import all your customers from your Reseller account into WHMCS.
Advanced Settings
This section is intended to provide special configurations and modifications for the Module and will be constantly updated with more content.
- Customizing Client Area Dashboard
- Howto Style your own Client Area Dashboard
- Dashboard Code Example
- Smarty variables for further customization
Customizing Client Area Dashboard
The RVPSM - VPS KVM Server Module comes with the Client Area Dashboard built-in and is available for six and five based templates. By default the template is set to "Auto" and applies the template you configured in WHMCS » Setup » General Settings » TAB General: "Template" if it is an original WHMCS template theme (currently five or six). If you use another custom template or if you use an original WHMCS template theme but with a custom folder name, then you can change this in TAB Settings:
- Navigate in WHMCS to » Addons » RCM Core Console v4 and access the R.V.P.Server Module Dashboard from the left sidebar Addon Menu or from the Core Addon Home widget
-
Click the TAB "Settings" and follow the onscreen instructions as shown below:

Howto Style your own Client Area Dashboard
If any of the built-in Dashboard Theme fits your custom theme, then you can style your own Client Area Dashboard. Follow the below small Guide to start immediately with a fully working Custom Client Area Dashboard:
- Create an empty file with your html editor or any text file editor such as notepad and add your customized html code. A valid Complete Code Example is available below.
- Save the file as clientarea.tpl and upload it into the /whmcsroot/modules/servers/rcmrvpsm/templates/ folder
- Navigate in WHMCS to » Addons » RCM Core Console v4 and access the R.V.P.Server Module Dashboard from the left sidebar Addon Menu or from the Core Addon Home widget.
-
Click the TAB "Settings" and scroll down to section "Dashboard Handling" and activate the option "Disable Management Dashboard?"

Complete Code Example for VPS Server Plans
{*
 * RCM VPS Server Provisioning Module - Custom Management Dashboard Template
 *
 * @package		Resellerclub Mods (gIF)
 * @author		Resellerclub Mods contact[at]resellerclub-mods.com
 * @copyright	Copyright (c) resellerclub-mods.com 2011-2019
 * @license		http://www.resellerclub-mods.com/en/terms-of-service/eula.html
 * @link		http://www.resellerclub-mods.com/
 * @version		v4.3.0
 *}

<script language="javascript" type="text/javascript">
	function showpass(){
		jQuery("#contentpass").slideToggle();
	}
</script>

<h2>{$LANG.rcmrvpsm_managementtitle}</h2>

{if $rcm_status neq "Active"}
	<table class="table table-list">
		<tr>
			<td><strong>{$LANG.rcmrvpsm_statustitle}:</strong></td>
			<td>
				<div style="color:{$rcm_status_color}">
					{if $rcm_status eq 'Suspended'}
						{$LANG.rcmrvpsm_vpssuspended}
					{elseif $rcm_status eq 'InActive'}
						{$LANG.rcmrvpsm_vpspreparing}
					{elseif $rcm_status eq 'Deleted'}
						{$LANG.rcmrvpsm_vpsstatusdeleted}
					{else}
						{$LANG.rcmrvpsm_vpsstatusunknown}
					{/if}
				</div>
			</td>
		</tr>
	</table>
{else}
	<table class="table table-list" style="text-align:left;">
		<tr>
			<td><strong>{$LANG.rcmrvpsm_statustitle}:</strong></td>
			<td><div style="color:{$rcm_status_color};">{$LANG.rcmrvpsm_vpsactive}</div></td>
		</tr>
		<tr>
			<td><strong>{$LANG.rcmrvpsm_vpsusertitle}:</strong></td>
			<td>
				{$rcm_adminuser}
			</td>
		</tr>
		<tr>
			<td><strong>{$LANG.rcmrvpsm_vpspasstitle}:</strong></td>
			<td>
				<div style="text-decoration:underline;cursor:pointer;float:left;" onclick="showpass();return false;">{$LANG.rcmrvpsm_shownhide}</div>
				<div style="float:right;display:none;" id="contentpass">
					<code>{$rcm_adminpass}</code>
				</div>
			</td>
		</tr>
		<tr>
			<td><strong>{$LANG.rcmrvpsm_controlpanelstitle}:</strong></td>
			<td>
				{$rcm_rcvpspanelbutton}
				{if $rcm_renewbutton}<div style="float:left;padding:2px;">{$rcm_renewbutton}</div>{/if}
			</td>
		</tr>
		{if $rcm_osinfo neq 'Fedora_23'}
		<tr>
			<td><strong>{$LANG.rcmrvpsm_addoncopatitle}:</strong></td>
			<td>{$rcm_copaurlbutton}</td>
		</tr>
		{/if}
		<tr>
			<td><strong>{$LANG.rcmrvpsm_addonwhmcstitle}:</strong></td>
			<td>{$rcm_whmcslicense}</td>
		</tr>
		{if $rcm_is_san eq '1'}
		<tr>
			<td><strong>{$LANG.rcmrvpsm_sanspacetitle}:</strong></td>
			<td>{$rcm_storageaddons}</td>
		</tr>
		{/if}
		<tr>
			<td><strong>{$LANG.rcmrvpsm_primaryiptitle}:</strong></td>
			<td>{$rcm_primaryip}</td>
		</tr>
		{if $rcm_defaultips}
		<tr>
			<td><strong>{$LANG.rcmrvpsm_assignedipstitle}:</strong></td>
			<td>{$rcm_defaultips}</td>
		</tr>
		{/if}
		<tr>
			<td><strong>{$LANG.rcmrvpsm_addonipaddresstitle}:</strong></td>
			<td>{$rcm_addips}</td>
		</tr>
		<tr>
			<td><strong>{$LANG.rcmrvpsm_serverostitle}:</strong></td>
			<td>{$rcm_osinfo}</td>
		</tr>
		<tr>
			<td><strong>{$LANG.rcmrvpsm_webspacetitle}:</strong></td>
			<td>{$rcm_webspace}</td>
		</tr>
		<tr>
			<td><strong>{$LANG.rcmrvpsm_bandwidthtitle}:</strong></td>
			<td>{$rcm_bandwidth}</td>
		</tr>
		<tr>
			<td><strong>{$LANG.rcmrvpsm_vpsramtitle}:</strong></td>
			<td>{$rcm_ram}</td>
		</tr>
		<tr>
			<td><strong>{$LANG.rcmrvpsm_vpscputitle}:</strong></td>
			<td>{$rcm_cpu}</td>
		</tr>
		<tr>
			<td><strong>{$LANG.rcmrvpsm_ns1title}:</strong></td>
			<td>{$rcm_dns1}</td>
		</tr>
		<tr>
			<td><strong>{$LANG.rcmrvpsm_ns2title}:</strong></td>
			<td>{$rcm_dns2}</td>
		</tr>
	</table>
{/if}
Smarty variables for further customization
The following smarty variables are available and you can use them to code your very own Dashboard without using the Code Example from above:
- {$rcm_domainid} = string number
- {$rcm_osinfo} = string
- {$rcm_cpu} = string
- {$rcm_ram} = string
- {$rcm_ramraw} = string number in mb
- {$rcm_planname} = string
- {$rcm_adminuser} = string
- {$rcm_adminpass} = string
- {$rcm_webspace} = string formatted and translated
- {$rcm_webspaceraw} = string number in mb
- {$rcm_bandwidth} = string formatted and translated
- {$rcm_bandwidthraw} = string number in mb
- {$rcm_vpserverdetails} = array
- {$rcm_dedicated_ip_array} = array
- {$rcm_cp_array} = array controlpanels
- {$rcm_sanaddons_array} = array san storage
- {$rcm_status} = string
- {$rcm_primaryip} = string
- {$rcm_defaultips} = string
- {$rcm_addips} = string
- {$rcm_whmcslicense} = string
- {$rcm_copalicense} = string
- {$rcm_renewbutton} = string formatted and translated
- {$rcm_rcvpspanelbutton} = string formatted and translated
- {$rcm_copaurlbutton} = string formatted and translated
- {$rcm_buy_whmcsaddon} = string formatted and translated
- {$rcm_buy_paneladdon} = string formatted and translated
- {$rcm_buy_ipsaddon} = string formatted and translated
- {$rcm_storageaddons} = string formatted and translated
- {$rcm_disableserveripaddon} = string number
- {$rcm_disablewhmcsaddon} = string number
- {$rcm_disablesanaddon} = string number
- {$rcm_disablecontrolpaneladdon} = string number
- {$rcm_vpstype} = string
- {$rcm_is_san} = string number
- {$rcm_is_ssd} = string number
- {$rcm_dns1} = string
- {$rcm_dns2} = string
- {$rcm_status_color} = string


